I already addressed the complexity of OAuth client-side programming (version 1 and 2) in a previous post. In that post, I talk about how mybiketraffic uses OAuth to authenticate itself on behalf of its users as clients on the Garmin Connect website, which still uses OAuth v1.0, and the Strava website, which uses OAuth v2.0.
But now, I am working with an app developer who would like to access my website as a client on behalf of his users. In other words, I need to implement the server side of OAuth 2.0 so that his app can authenticate his users and act on behalf of his users.
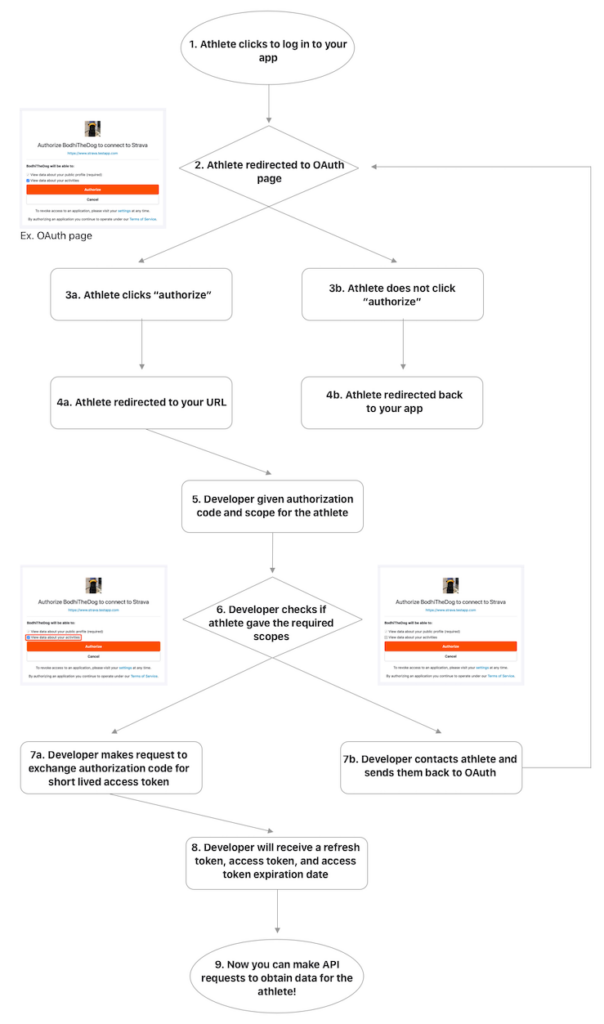
Thus, I dove whole-heartedly back down the rabbit hole into OAuth over the past couple weeks. Yes, a couple weeks, because it is indeed complex despite the following claim in the screenshot below from https://oauth2.thephpleague.com/

When the flowchart looks like this, the backend supporting all this cannot be trivial!
Why Bother?
So why would you want to do something this complex? Well, there are a lot of people and components and permissions and agreements involved.
Client? Server?
OAuth connects services together in a Client-Server fashion. One service wants to use the other service on behalf of the first service’s users. That first service is the Client, and the second service is the Server. In my earlier tale of complexity, mybiketraffic.com is the Client using two different versions of OAuth to interact with two different Servers — the Garmin Connect API and the Strava API.
In the scenario described in this current post, getcadence.app is the OAuth Client that wants to access the mybiketraffic.com API which plays the role as the OAuth 2.0 Server.
An immediate complication in this current scenario is that the end user may only be using the phone app and doesn’t have an account on mybiketraffic.com yet. So during the initial OAuth authentication process, the user may need to create an account on mybiketraffic.com before proceeding.
How does it work?
The earlier Strava flowchart describes the process very well, but let me describe it in an ordered list of steps.
- Setup – the first step (not shown in the Strava flowchart) is for the Client to request access to the Server API. In doing so, the Client provides a short description of what activities it will be doing on behalf of its users with the Server API. Upon approval (or automatically), the Server issues a Client ID and a Client Secret which the Client must write down as only the hashed version of the secret is stored in the database.
- Authorization – the next step is client/user authorization. In this step, the Client (getcadence.app) directs its users to the Server (mybiketraffic.com) with a link that includes the Client ID, telling the server which client is trying to connect. The server looks up the info entered in Step 1 and displays it to the user and does the following:
- Ask the user to login or create an account
- Click a button to “Authorize” the Client to act on their behalf in the manner described (i.e., scope of actions)
- If the user clicks the “Authorize” button, then that gives permission for the Client to act on its behalf in the manner described (i.e., the scopes listed).
- SECURITY NOTE – client id’s aren’t guarded as closely and in fact can be easily read from the link provided by the Client. What is to prevent a rogue website or app from providing a link with a rogue redirect_uri? Well, nothing … but upon redirecting, the Client must post back some information (the authorization code generated for this particular user as well as the CLIENT SECRET, which hopefully has been guarded closely and not available to the rogue website or app)
- Client Authentication – as mentioned in the security note above, the Client must respond with identifying information to prove that the client is who they say they are. Specifically, the client must POST the Client id, the Client secret, and echo back the authorization code the Server gave it in response to the Authorization step.
The server verifies the client ID, client secret, and authorization code. The server deletes the authorization code so that is “one-time use” eliminating possibility of a replay attacks (see security note). The server also generates an access token, refresh token, and an expiration date for one or both tokens. The server stores this token information including which user id that token maps to. An alternative is to digitally sign and encrypt this information in the token itself (JSON Web Token – JWT). This saves the server from having to store the tokens, saving a tiny bit of resources, but then leads to extra steps involving validating signatures on both the client and server side. An alternative is to store the token as an Opaque Token, meaning its just a random string of characters that maps to all the relevant information via a server database.
SECURITY NOTE – The authorization code is stored in a table with the user ID of the user who made the authorization. The authorization code needs to be a one-time use code as anyone who intercepts the transmission (shouldn’t be possible b/c of HTTPS) could use the code to gain access to their own access token on behalf of the user.
SECURITY NOTE – HTTPS encryption is crucial to the security of the entire OAuth 2 protocol. This was highly controversial during the development of OAuth 2 and several of the creators of OAuth 1 completely abandoned the OAuth 2 project because of this decision. Exposure of the authorization code before it is used or the access token at any time immediately compromises security and would enable an attacker to carry out any of the authorized activities on behalf of the user outside the control of the Client who the end user was expecting to act on their behalf. - API Action! Once the access token has been obtained, the Client can now use the Server API on behalf of the user. Each request to an API endpoint must include an HTTP header that looks like this:
Authorization: Bearer <ACCESS_TOKEN STRING>
The server uses the ACCESS_TOKEN STRING to look up which client made the request and determine which user the Server should use in reference to the API request (e.g., adding a new ride, or listing all rides from a user, … or deleting a ride!)
The server should verify that the access token hasn’t expired. These are designed to be short-lived tokens since they are essentially KEYS to immediately grant access to the API on behalf of a user.
SECURITY NOTE: The API endpoints can have varying levels of sensitivity. If a hacker gains access to essentially a read_only access token, then the primary concern is user privacy related to the information obtained illegally. If, on the other hand, there is write access, then data can now be added or deleted so data integrity becomes a concern. This is the purpose of SCOPES. The idea behind scopes is to limit what the Server is able to do on behalf of its clients to the minimum amount necessary so that if something were compromised, damage can be mitigated. - Refresh – A major difference between OAuth v1.0 and OAuth v2.0 is that OAuth v1.0 had “forever tokens”. The access token provided by OAuth v1.0 was valid until it was manually revoked. It had no expiration. Because OAuth v2.0 tokens have an expiration, it limits the time during which exposure of an access_token matters.
This does add an extra step to the OAuth 2.0 process (compared to OAuth 1.0). Specifically, the client must send a request for a new access token once the access token expires. The specification also allows an expiration on the refresh token itself so that if the refresh token expires without being used, the end user must Authorize the app again. I have not seen this used in practice (either by myself or by Strava). But it’s possible this is common?
The refresh step is again a POST request, this time with the client id, client secret, and refresh_token. If everything is valid (client id and secret), then the Server looks up which user is associated with the refresh_token, issues a new access_token/refresh_token pair and deletes the previous access token. - Revoke / Deauthorization – It’s possible the end user decides they no longer want to use the Client app and/or they no longer want the Client app to act on their behalf. In this case, OAuth 2 has a protocol for revoking a token.
The client issues a POST request with the client id, secret, and valid access token. Note that if the access token is expired, the client must first obtain a new access token via refresh before then revoking the token.
SECURITY NOTE: It might be tempting for the server to simply ignore a deauthorization request with an expired access token. Or to just go ahead and delete that token. Neither of these situations is good. In the first, a hacker could later obtain the refresh token and request a new valid access token. In the latter, the deauthorization request may have come from an invalid source. The hacker may not have intercepted the refresh_token. The hacker may have only intercepted the access_token, so the Server needs to force the hacker to obtain a valid access token first before deauthorization (which would be impossible if they don’t have the refresh token).